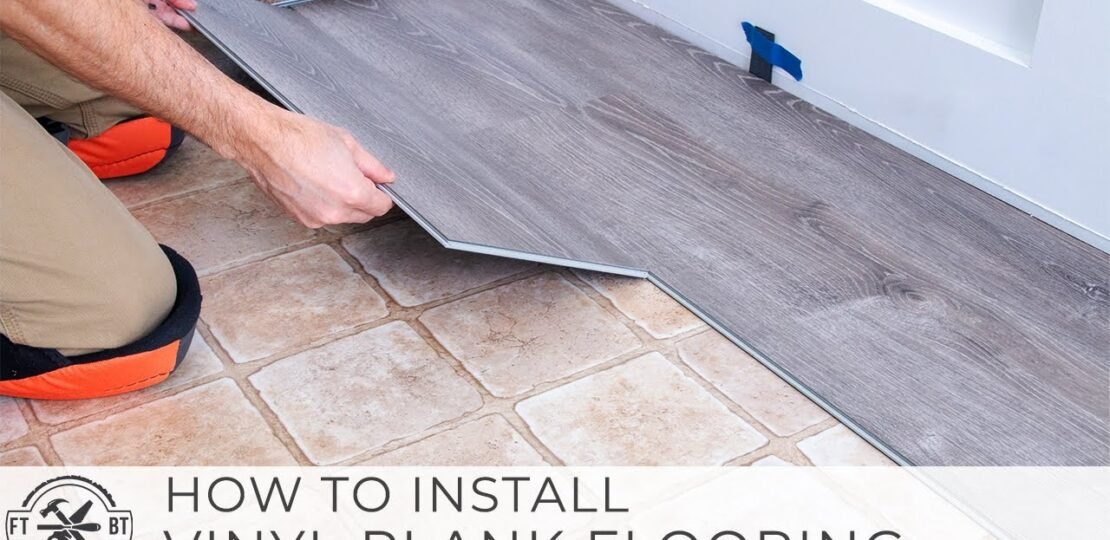
How to Install Vinyl Plank Flooring as a Beginner | Home Renovation
September 24, 2024 | by
Beginner Tips for Installing Laminate and Vinyl Flooring
I’ve installed ceramic tile before, but this is my first time doing laminate or vinyl flooring. I’ll be installing this in my laundry room and giving you all the beginner tips that I learned along the way.
I started by moving the laundry machines and everything else out of the room. Apparently, elves don’t really steal your socks—they just hide them under the dryer. While the machines were gone, it was a great time to paint the rest of the wall that I didn’t paint initially because I didn’t think anybody would ever see it. Now, I know I’m not the only one, so comment down below and tell me where your unpainted walls are hiding in your house.
Preparation for Installation
Next, I pulled off the quarter-round molding to prep for the install. I would have pulled off the baseboards, too, but since I have wainscoting installed, it would be a huge undertaking. In the end, you won’t really be able to tell the difference anyway. The vinyl planks that I’m using are a little under 4 feet long and just under 8 and 3/4 of an inch wide. I’ll have a link below to this exact product as well as all the tools that I used during the vinyl plank flooring installation, which I tried to keep as basic as possible.
Planning the Layout
Before the install, you need to do a little planning. For a nice-looking room, you don’t want a super-short board at the beginning or end of a row, and you don’t want a narrow run at the end of your installation either. The install instructions with your flooring should help you figure this out, or you can nerd out like I did and make a 3D model of the room and lay out the planks exactly how you want them beforehand. Seriously though, for an overanalyzer like me, this is the only way to go. You can map out and stagger the seams and play around with the different layouts based on the bump-outs in the room to see how it’s all going to look. If you don’t have any programs, you can do this with just graph paper, too.
With my layout all done, I went back to the laundry room to start the install. You always want to start on the left side of the room in a corner due to the positioning of the tongues and the grooves on this flooring. I pried up the transition piece between the current vinyl sheet floor and the carpet. Then, I cut back the carpet to make room for the new transition strip, which is a metal channel. There was a small gap between the plywood underlayment of the vinyl sheet and the tack strip of the carpet, so I filled in the gap to give that channel a little place to be attached.
Undercutting the Door Jamb
I used a sample piece of the flooring as a spacer and undercut the door jamb with a flush-cut saw. This will let the flooring slide underneath the trim for a clean look. On the baseboards, I’ll cover those gaps with the quarter-round that I took off earlier. I cut the other side of the door too, and I cut into the baseboard a bit so that I could slide the floor in cleanly under the whole jamb. That wasn’t just a mistake; I did it on purpose.
Installing the Transition Channel
Next, I measured the transition channel for the door opening. It has marks on the back where it’s supposed to snap cleanly, but it just bent when I tried to do it, so I grabbed a hacksaw and cut it to size instead. I positioned the channel so that my finished transition piece would just hit the middle door stop, then I secured it to the floor with screws.
During my layout, I decided to take two and a half inches off the width of my initial starter row. This will give me two and a half more inches of width on the other side of the room to avoid those narrow strips that I mentioned earlier. You’ll see that in just a bit. My walls aren’t exactly straight either, and I needed to account for that in this cut. I used the vinyl sheet design as a straight reference to lay the planks on, and I measured the gaps across the wall. If you’ve taken up the flooring or don’t have a reference line, you can always snap a chalk line and use that to reference the measurements.
Cutting and Snapping the Planks
I marked the first plank on both ends for this angled cut line. Vinyl plank flooring can be scored and cut with a utility knife, so I went ahead and grabbed my T-square to score the plank between my two marks. The problem I found is when trying to snap the plank along that line since I couldn’t really grab it and pull it up to snap it. I put a piece of scrap wood underneath the score line and just beat on it with my mallet until it snapped. As you can imagine, this went pretty badly. I quickly realized that scoring and snapping for the long cuts is not a great option.
Instead, I took it down to my shop and laid out a new line that was a quarter-inch in from that jagged mess that I just made. Then, I used a circular saw to cut the line, and it turned out great. I was really just trying to avoid using power tools as much as possible, but using a jigsaw, table saw, or circular saw is really the only way to go here.
Installing the First Plank
The vinyl plank is a floating floor, and it needs to be held off the walls a quarter-inch in all directions. To do this, I used these wedge spacers from the flooring install kit that I linked and taped them to the wall. I laid down the first plank under the door jamb, but it was still a bit far from the metal channel. So, I marked the piece along the door jamb and used a jigsaw to quickly trim off that corner, and then it fit in there nice and smooth.
The next piece gets dropped in and locked into that first piece. Using a tapping block across the front on the seam aligns the boards flush with each other. This got me to my first partial board. I measured the gap to the wall and transferred it over to the board. Then, I used a 12-inch carpenter square to score a line on the plank with my utility knife. I flipped it over and snapped the plank by pulling up on the hand while supporting it behind that scoring line. To finish the cut, I flipped it over and cut through the backing to release the piece. When I snapped this board, it really turned out a little bit jagged. It was because when I scored the plank the second time, the blade veered off that original line a little bit. So, make sure if you’re gonna go over it twice that you stay on that original line, or you’re gonna need to clean up the edge like I’m doing here.
Continuing the Installation
Hey, if you like what you’re seeing so far and you haven’t done it already, go ahead and hit that subscribe button and ring that bell for some more great content. I cut this small piece the same width as the other first-row boards and then installed it on the end. To pull the board tight, I used this small pull bar that hooks over the end of the board and helps you pull it into place using a mallet.
To start the second row, I cut a full plank down to 18 inches long. This time, I was a lot more careful scoring that line, and the piece snapped nice and clean. Connecting the boards from here on out is pretty easy. You just angle the tongue on the long edge into the groove of the row before it, then you lower the plank and tap it into place using this tapping block from that kit that I mentioned earlier. A few taps with a non-marring mallet across that short seam also locks it into place.
Working in a small room has a lot more stops and starts because I could only put down one or two full boards in each row before needing to make another cut. At the end of this row, I had a really small cut to make off the end to make my board fit. You can’t really score it and snap it because it’s just too short. So, go ahead and use a circular saw for this as well. After I got the first two rows in, I used some dumbbells to weight them down and keep that floating floor from moving as much. There are only so many different patterns on these planks, so I made different piles of them in the room to help keep the floor as random as I could. When I came in to grab a board, I’d rotate through them so that the similar planks weren’t close to each other. This is a great way to make sure that your floor looks as best as it can.
Dealing with Door Jambs and Bump-Outs
When I got to the other door jamb, I had to notch the piece like before. I laid out the plank and transferred marks where the door jamb was and how much I needed to take off. When you’re doing this, always try to err on the side of taking off too little versus too much so that you don’t get stuck with any big gaps. After a few back-and-forths, I had it fitting really nicely. To install the plank, I slid it up close to the door jamb and then locked it in place with that prior row. Then, I used the tapping block on the end of the board and just tapped it in place until it slid all the way into the trim.
As you’re working through the room, you can start using some of the offcuts from one end of the room to start or finish the other end of the room. Keep that in mind to make the best use of your flooring so you don’t have a bunch of scraps that go unused at the end. It’s a little hard to see here, but I’m really staggering the seams of these planks randomly. You want to avoid having a consistent spacing between seams like a brick-laid pattern because it just won’t look natural to the eye.
When I got to the bump-out on the other side of the room, I measured and marked the planks for the notch. This corner was way out of square, so I made sure to measure at the beginning and the end of each side of that notch. I made the angled cuts with my jigsaw, and taking that extra time gave me a great fit. When I got back to the sink vanity, you can see why I made that first row narrower than the full width. If I had started with a full-width plank, then this little sliver in front of the vanity would have been under two inches. I also planned the staggers so that I didn’t need to notch this narrow piece either and would just have a small notch on the next full-size plank. Planning these little details ahead of time is really gonna make your flooring install go much smoother and look a lot nicer.
Final Touches
If you have a board that doesn’t want to lock into place, make sure to check the tongues and the grooves for debris. A little bit of flooring got stuck in this groove and kept it from seating properly. Another little surprise in the install was this overflow drain in the floor. I’m gonna work around this, but if you have a floor outlet or another obstacle to work around, you can use these same steps. I measured the distance off the side of the cabinet and off of the back wall and marked the plank. Then, I used a Forstner bit a little bit larger than that pipe in the floor. The vinyl flooring is pretty easy to drill through with normal woodworking bits, so it goes pretty quickly.
Next, I laid the board in place and finished the row before putting an extension onto that drain. I just marked it and cut a one and a half inch to one and a quarter inch PVC down pipe to length and installed it just below the surface. I added a little bit of caulk around the edges, and that gave me a nice watertight seal. It looks way nicer than it did before, and the water will have a place to go if it ever leaks out.
From here, I could reinstall my quarter-round molding and my carpet transition. Since this is a floating floor, just make sure to nail into the baseboards and not into the floor when you’re putting on that molding. I cut the final transition piece to size and seated it in that metal U-channel that I installed earlier with my mallet. This floor really brings the laundry room together. It looks awesome in here. I think installing vinyl plank flooring is a great option for an easy install with a big impact, and you’ll have some really durable flooring.
Hey, if you want to see how I did that wainscoting in that room or how to tile a bathroom, I’ve got a playlist for you right there with home renovation projects. I’ve got another one for you down there as well that you might like. Until next time, guys, get out there and build something awesome.
RELATED POSTS
View all